
allpay Prepaid Guide
The PEPS and Sanctions Process
Introduction
Prepaid via the Payments Hub is a web‑based platform that enables organisations to order and manage prepaid cards and accounts efficiently.
Prepaid cards are issued by Mastercard® and can be used wherever Mastercard® is accepted.
Access to allpay Prepaid is provided through the allpay Payments Hub. For instructions on how to log in, please refer to the Payments Hub User Guide
Training
To help you get the most from Prepaid via the Payments Hub and to reduce administrative effort, we recommend that all users take a few moments to review this guide.
As part of your onboarding process, you will attend a training session covering how to use Prepaid via the Payments Hub. If your organisation would benefit from refresher training at any point, please contact your allpay Client Development Manager.
Accessing Prepaid via the Payments Hub
Prepaid is accessed through the allpay Payments Hub. Our prepaid products form part of the Disbursements offering and are available through two programmes: Direct Payments and General Spend.
Further information on navigating the Payments Hub can be found in the Payments Hub user guide.
User Permissions
User permissions are set up and assigned through the Payments Hub and it's important that each user is only given the permissions required to complete their job role. Being mindful of user permissions helps prevent conflicts of interest and potential misuse of Prepaid via the Payments Hub. For detailed information on adding and modifying users in Payments Hub, please refer to the Payments Hub User Guide
Below are the permissions for General Spend:
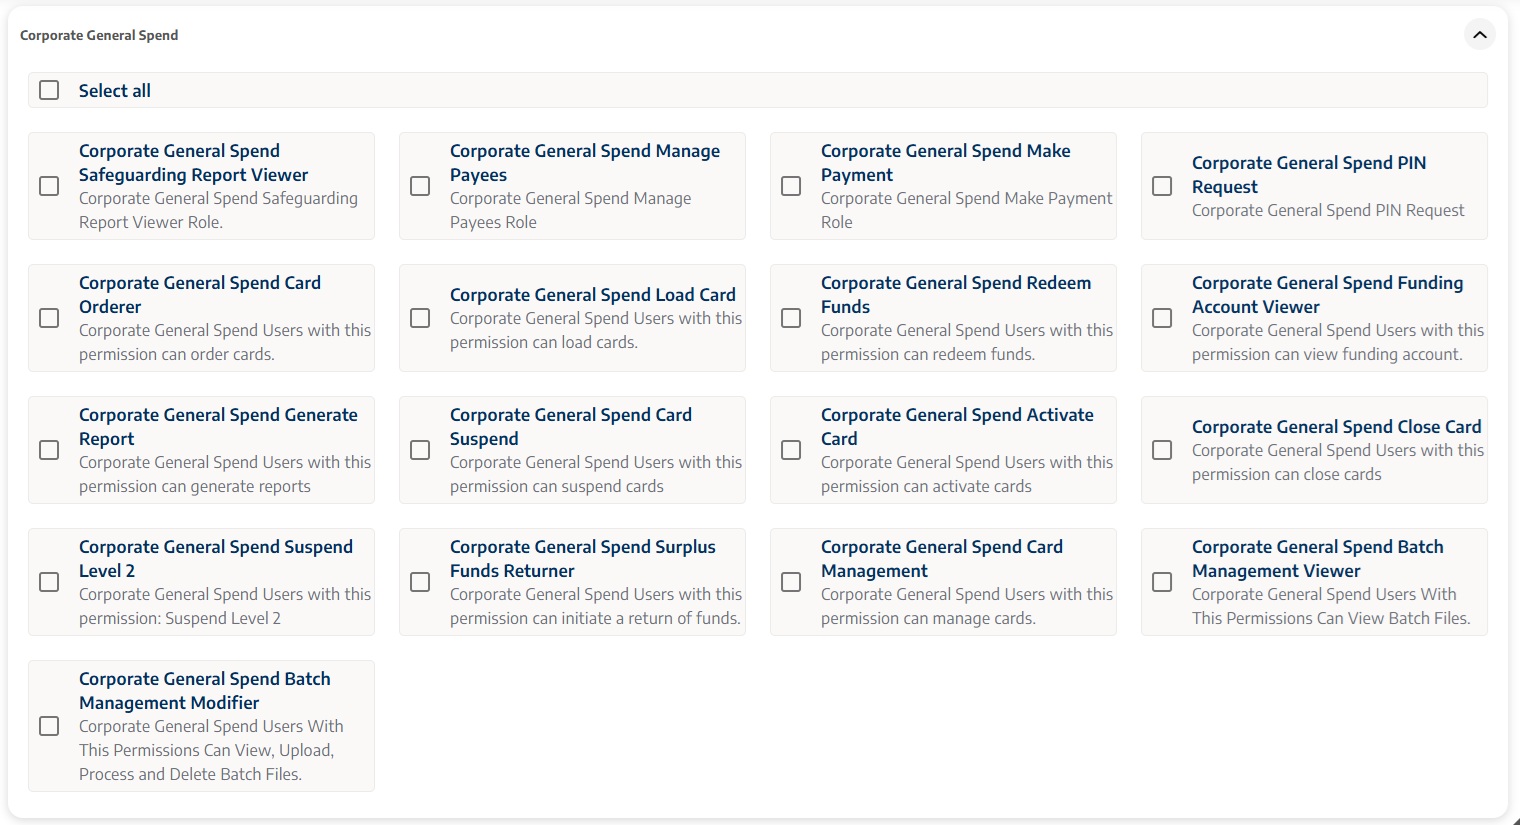
The different permissions in allpay Prepaid are detailed below:
- Safeguarding Report Viewer - Allows users to view automatic safeguarding reports to help monitor client wellbeing
- PIN Request - Allows users to send a PIN to a cardholder by SMS.
- Card Order - Allows users to order new and replacement cards on behalf of cardholders
- Load Card - Allows users to add funds to a card from the programme’s funding account
- Redeem Funds - Allows users to move unused money from a card back into the programme’s funding account
- Funding Account View - Allows users to view balance details and previous transactions on the programme’s funding account
- Generate Report - Allows users to create customised reports to support programme monitoring and audits
- Suspend Level 1 - Allows users to temporarily suspend a card (for example, if it is lost).
- Suspend Level 2 - Allows users with higher-level access to apply a more advanced suspension (if required by the organisation)
- Activate Card - Allows users to activate a card on behalf of a cardholder. Note: Cardholders normally activate their own card through the cardholder portal or by using the automated phone line (IVR)
- Close Card - Allows users to permanently close a cardholders account, stopping all activity and returning any remaining funds to the programme’s funding account
- Surplus Funds Returner - Allows users to return excess funds from the programme’s funding account back to the organisation’s bank account
- Batch Management View - Allows users to be able to view batch files created for processing multiple cards or payment actions
- Batch Management Modifier - Allows users to view, upload, process and delete batch files
Looking to return surplus funds?
When you go live with a prepaid scheme, you will be given the opportunity to nominate another organisation bank account that you can return surplus funds to (from the Funding Account)
A user will need to have both Funding Account Viewer and Surplus Funds Returner permissions to be able to do this.
Below are the permissions for Direct Payments
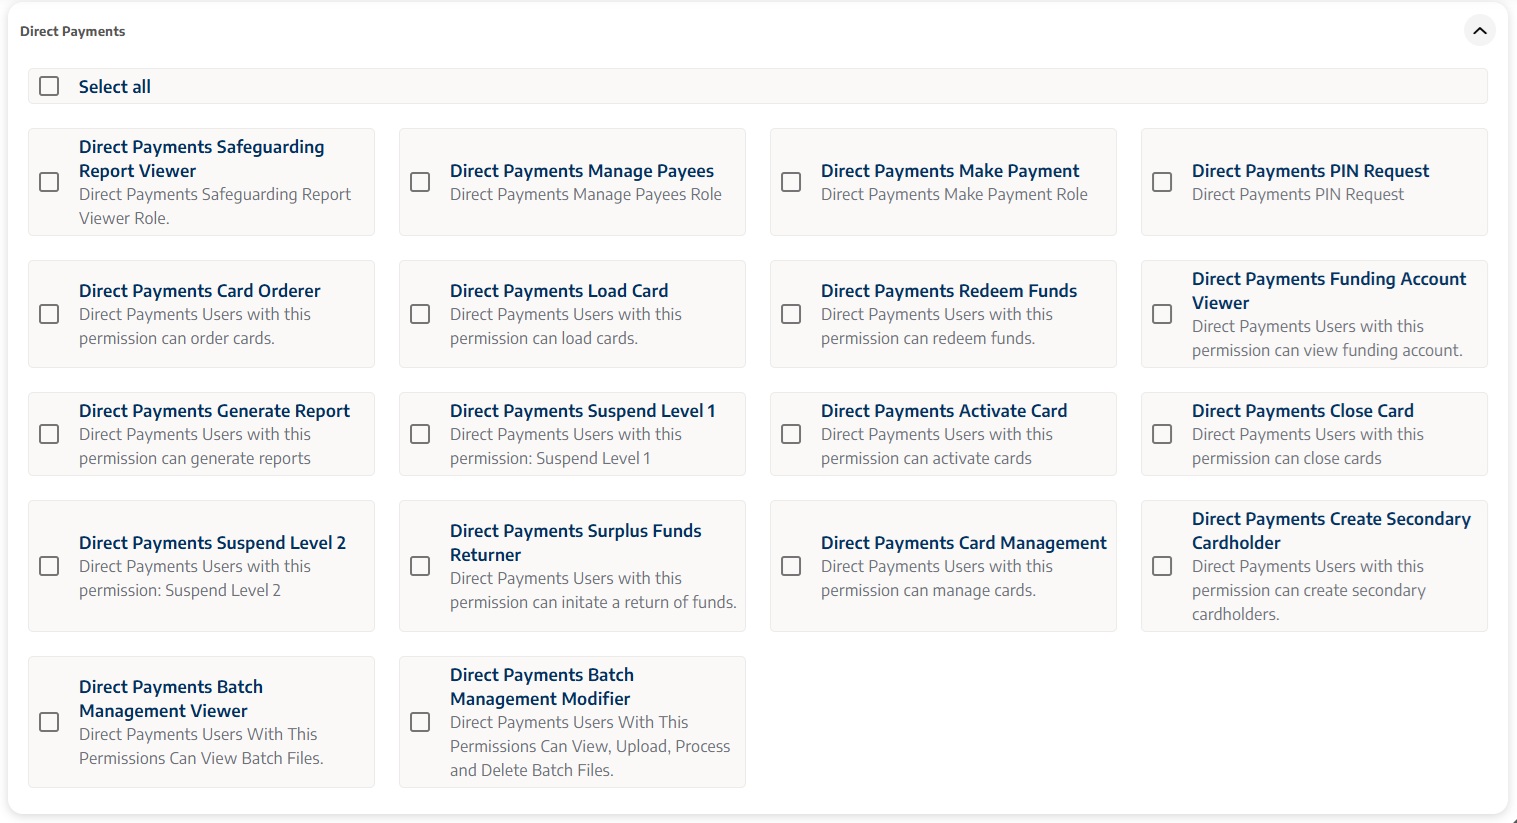
- Direct Payments Manage Payees - Allows users to add, edit or remove payees on behalf of cardholders
- Direct Payments Make Payment - Allows users to make payments to approved payees on behalf of cardholders
Homepage Navigation
- Cardholders
- Reports
- Batch Management
- Payees (Direct payments only)
- Funding Account
This user guide will provide detailed information about each area in the following sections.

Cardholders
The Cardholder area is for creating new cardholder accounts, and for managing and supporting your existing cardholders.
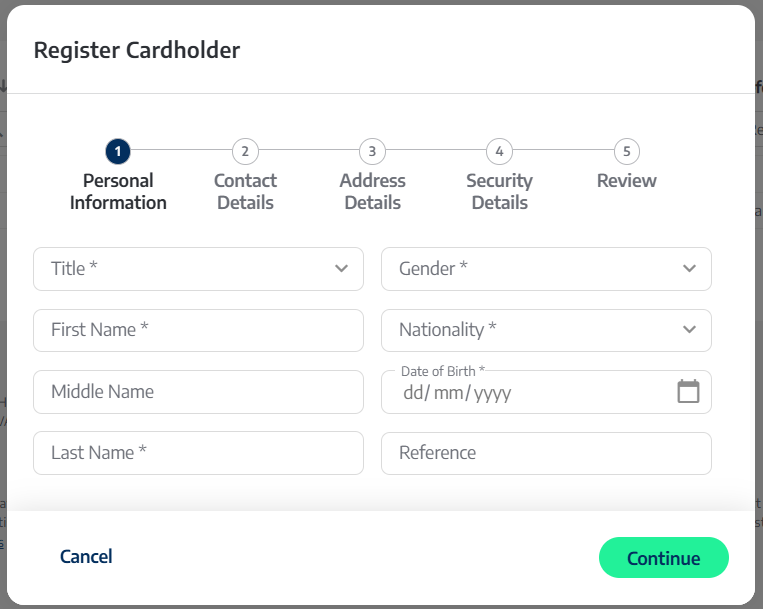
Create Cardholder
To create a cardholder, click Create Cardholder in the top right corner of the cardholder section (highlighted in green). This will open a five-step workflow for you to follow.

When creating a new cardholder, fill in all mandatory fields indicated with an asterisk (*). It is important to make sure the information you enter for your cardholders is accurate to allow us to complete the necessary checks required for financial products in the UK.
Need to add a lot of cards quickly?
The Batch Management functionality allows you to add cards in bulk, rather than filling out a separate form for each one.
See Batch Management later in this guide for guidance on the batch management process specifically.
Step 1 - Cardholder Personal Information
In this section you need to fill in the Title, First Name, Last Name, Gender, Nationality and Date of Birth of the cardholder.
One of the fields in this section is called Reference. This field isn't mandatory but we recommend using it to add any codes or ID that will help you identify the cardholder within your organisation. It's a useful way to link the cardholder to your own systems or records.
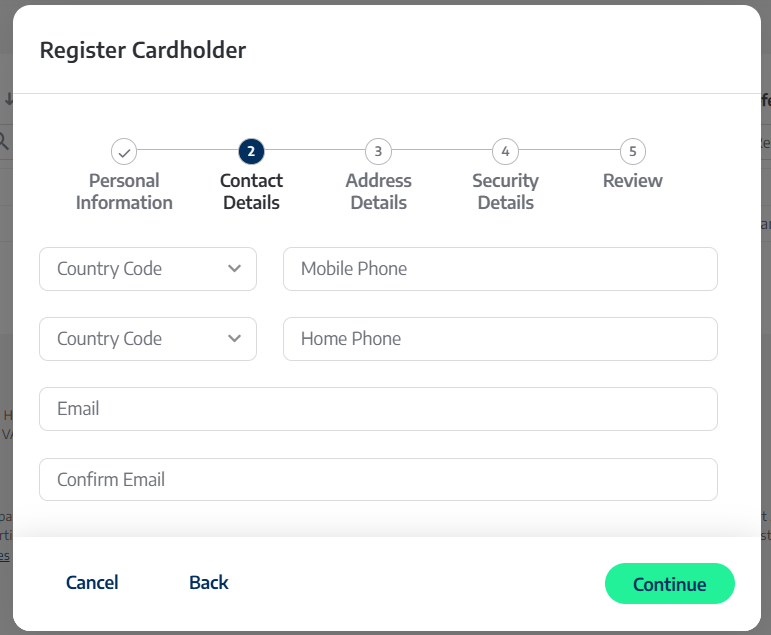
Step 2 - Cardholder Contact Details
Enter the contact details for the new cardholder here. Whilst these fields aren't mandatory, accurate information is required for certain functions.
- Mobile Phone
- Can be used to send the Cardholder their PIN via SMS
- Must be used to set up a 3DS2 password which is required to make payments at online checkouts. See Setting your 3DS2 Password for a customer friendly walkthrough on how to do this
- Required for access to the Cardholder Portal. See the Customer Facing guidance for more information
Step 3 - Cardholder Address Details
Enter the cardholder's address details here. If using the cardholder delivery option, this address will automatically populate the delivery address as well.
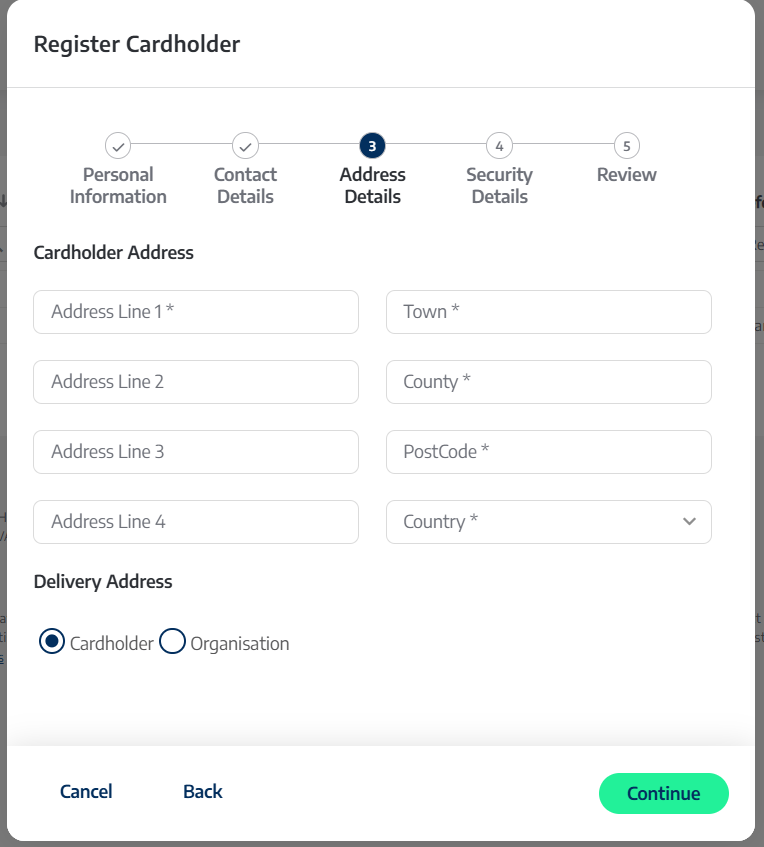
In addition you are required to choose the delivery option for the physical card to be delivered to. The options are:
- Cardholder: The card will be delivered to the address provide for the cardholder
- Organisation: The card will be delivered to an organisation address of your choice. Use the selection box to choose the correct organisation address.
How do I add an organisation delivery address?
If you have selected organisation delivery when going live with your programme, at least one organisation address will have been added during the onboarding process.
If you need to add an additional organisation address at any time, please contact your allpay Client Development Manager. Requests for new organisation addresses should be submitted as early as possible, as the required Know Your Business checks carried out by allpay can take up to four weeks to complete.
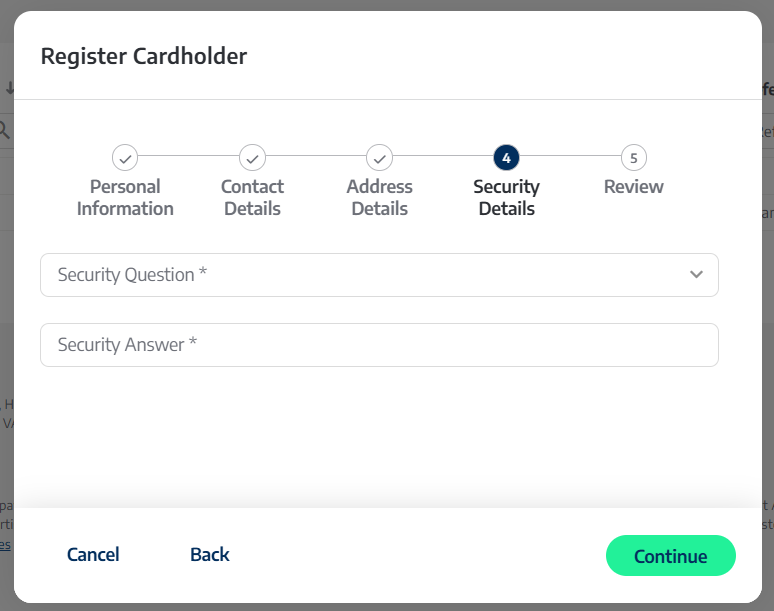
Step 4 - Cardholder Security Details
This section is mandatory. Please ensure that you select a security question that the cardholder will be able to answer easily.
The security question is used by the allpay Client Services team to confirm a cardholder’s identity if they need to contact us.
What if I don't have anything appropriate for a security question?
How do I enter this on a batch cardholder registration file?
When registering cardholders using batch management there is no option to add a security question.
If a security question is required, you will need to edit the cardholders profile to add a security question after registration.
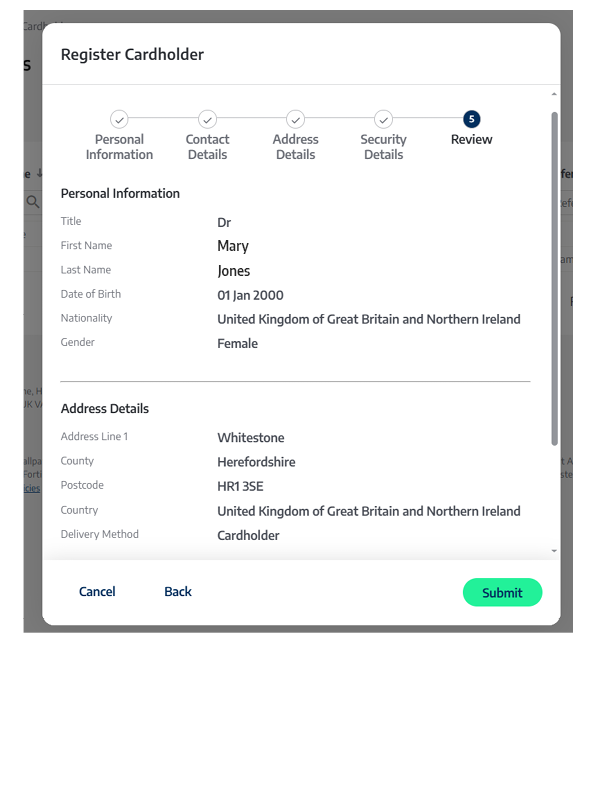
Step 5 - Review
Once you have completed the create cardholder steps 1-4, you have an opportunity to review the information inputted. Once you are comfortable with the information, select Submit. This will send the Cardholder request to allpay, and following the required authorisation checks, the account will appear in the Cardholder section. Please see PEPs and Sanctions Process for more detail.
Existing Cardholders
When you click on the Cardholder section, you will see a list of all your existing cardholders registered on this programme.
Selecting your cardholders
You can filter this list by clicking on the corresponding boxes at the top of each column. Filter options include:
- Client ID: The unique identification assigned when the cardholder is register for a prepaid card
- First Name: The cardholders first name
- Last Name: The cardholders last name
- Card Type: Whether the cardholder is a primary or secondary cardholder (Direct Payments only)
- Date of Birth: The cardholders date of birth
- Reference: Your code entered at card registration that might help your organisations users identify the cardholder
- Postcode: The cardholder postcode
- Last 4 PAN: The last four digits of the 16-digit number on the back of the cardholders card
Enter the relevant information and the system will filter the cardholder list to support selection.
To access cardholder management, select a card from the filtered table displayed.
Before sharing any personal or financial information, you must always confirm that you are communicating with the correct cardholder. This is done by completing the Cardholder Security Check. This step is mandatory and ensures compliance with GDPR, Anti‑Money Laundering (AML), and Know Your Customer (KYC) regulations.

To complete a Cardholder Security Check, ask the cardholder to provide two pieces of information from the top section of the screen. You must also confirm evidence of card usage by confirming any recent transactions from the bottom section using the checkboxes provided.
If the cardholder is unable to correctly answer the identity and transaction questions, do not share any information. Select Failed to record the outcome.
If all details are confirmed successfully, select Confirm. This will allow you to proceed to the card management screen.
The Bypass Security Check option allows access to the card management screen without completing the Cardholder Security Check. This option must only be used for administrative purposes and must never be used when you are speaking directly with a cardholder.
Managing your cardholders
Once the cardholder’s identity has been successfully confirmed, you will have access—depending on your user permissions—to additional information for the selected cardholder.
This information enables you to review cardholder details and carry out specific actions related to that cardholder.

Directly below the cardholders name, you will find the following information:
- Account Status: Shows whether the cardholders account is active or inactive
- Card Status: Shows whether the card is active, not activated, expired, closed or suspended
- PIN Status: Shows whether the cardholders PIN is currently active. To aid the cardholder you can use the Rest PIN Attempts on the right to re-activate this if the status shows as blocked
- IVR Password: Shows whether the cardholder has activated access to the allpay interactive voice response (IVR) line. Once activated, cardholders can use the allpay automated support to check their balance, retrieve their PIN and check recent transactions.
- Available Balance: Displays the amount of funds available to the cardholder
- Settled Balance: Shows the actual funds available to the cardholder not including any pending transactions
- Organisation Name: The name of your organisation and this programme
On the right side of the screen there are buttons for a number of administrative functions. These will be visible for you depending on permissions set by your organisation:
Activate New Card Select this option to support the cardholder with activating a new card. This option will only be displayed if the cardholder has a new card that requires activation.
Load Card Click here to load funds directly onto the cardholder's account:
- Funds to the card will come directly from your organisation funding account
- The value and frequency of loading funds to a cardholder account will have been agreed between your organisation and allpay before onboarding
- You can load any amount onto the card provided it falls within your load limit and is available within your funding account
Redeem Funds Click here to redeem funds from the cardholder's account:
- Funds redeemed will go directly from the card back into your organisation funding account
- You cannot redeem more than the available balance of the prepaid card
Create Secondary Cardholder For Direct Payment Programmes only. This functionality will only be available to you if you have requested to be able to support your cardholders with secondary cards.
A secondary card is an additional direct payment card intended for use by someone acting on behalf of the primary account holder, for example, a carer, support worker or an Appointeeship scheme.
- Secondary cards have their own Client ID, so you can differentiate when viewing Transaction History between transactions that have been made on either the primary or secondary card.
- Secondary cards can also be created in bulk using a batch upload file template, for more information see the batch management section in this guide.
- The secondary card forms part of the same account as the primary therefore they will have a shared balance.
Make a Payment For Direct Payment programmes only. Using an account number and sort code you can make faster payments from this card to other UK bank accounts.
Renew Card If the card is currently active, it will automatically renew when it gets close to its expiry date. You can choose to renew the card early - this option will appear when the card has less than 45 days left before it expires.
Send PIN Need to remind your cardholder of their PIN? Click here to send a PIN reminder via SMS. The cardholder will need a mobile number on their profile in order to do this.
Reset PIN Attempts If the PIN has been blocked due to too many incorrect attempts, you can reset the cardholder's PIN with this option.
Suspend Card Use this option to temporarily suspend all cardholder activity on the card. You can still add funds to a card while it is suspended.
- The number shown next to 'Suspend Card' indicates the level of suspension you can apply to a prepaid card. This will be either Level 1 (lower) or Level 2 (higher), depending on the permissions given to you by your organisation.
- The suspension level does not affect how the cardholder can use the card—it simply reflects your level of access.
Close Card Use this option to close the account:
- The current card on the account will be marked as 'To be closed' for 32 days to allow for any outstanding transactions or refunds to be processed
- Any remaining funds in the account will be returned immediately to the funding account
Reset IVR Password allows you to reset the cardholder's IVR password used for accessing the automated phone line.
Block and Replace You can block the card for the cardholder and request a replacement:
- You can support the cardholder by marking the card as lost, stolen or damaged for them, or they can complete this themselves via the automated IVR or via the cardholder portal
- Whichever method is used to mark the card as lost, stolen or damaged, the card will be re-ordered and should arrive within 5 working days
Freeze Card Temporarily stops the card working for the cardholder. This is a cardholder functionality and can be unfrozen by the cardholder, on the cardholder portal, or by contacting yourself or the allpay Client Services team.
Block Account For Direct Payment programmes only. You can block all banking and card transactions on the account.
- You can use this to support the cardholder when there are transactions on the account which have not been recognised. This could be used for both transactions using the bank account and sort code and those using the physical card.
- You can support the cardholder by unblocking to resume normal functionality by clicking 'Unblock Account'
- It should be noted that when using this functionality, any physical card (including secondary cards) associated with the account is automatically frozen.
At the bottom of the cardholder management page are a number of tabs that also provide information and functionality for the cardholder.
Transaction History Shows a chronological list of transactions on this prepaid card, including both credits and debits.

This section displays transactions across multiple cards. If the cardholder, therefore, has had multiple cards from renewal, lost, stolen or damaged replacements, or secondary cards (Direct Payments only) all transactions will be displayed.
Transactions can be filtered with the boxes at the top of each column of data including:
- Date: Allows you to filter by date, bringing up a calender. This allows filtering by quick dates on the left, to filter when the transaction took place
- Card Type: Filters the transactions between primary and secondary cards
- Merchant: Filters by the name of the merchant who processed this transaction
- Type: Filters by the type of transaction. Enabling you to filter for top ups, BACS transfers, Direct Debits, Debits etc'
- Status: What is the current status of this transaction
- Recurring: Indicates extra detail for recurring payments
- Amount: What is the value of this transaction
You can also left click any transaction in the portal to expand the information avaialble, including details like the MCC (Merchant Category Code) it was processed under.
Card Configuration
This section highlights the configuration of the card you are viewing including limits and regional restrictions.
Card Load

Displays a list of card load limits, including maximum load per day, week, month and year in both volume and value. The Used and Progress columns display the current running total.
ATM Withdrawals

Displays a list of card ATM withdrawal limits, including maximum withdrawal value and volume over a day and a week. The Used and Progress columns display the current running total.
Allowed Regions and Ecommerce

Displays tiles corresponding to merchant regions as well as one tile for E-commerce.
You will only be able to enable regions that have been agreed at a programme level.
Certain high risk countries are always blocked.
Even if the region is otherwise enabled, certain high risk countires will always be blocked on prepaid cards.
Retail

Displays a list of card retail transaction limits, including maximum spend value and volume over a day and a week. This includes both online and physical point of sale transactions. The Used and Progress columns display the current running total.
Profile
In this section you can find all the key information for the cardholder, their account and prepaid card details.
Most of the information here is what has been entered for the cardholder when they were added to the system, you can also find generated information on this page such as Bank Account Number and Card Expiry Date.
If you need to modify any of the details in the cardholder profile, click Edit at the top right in the box corresponding to the relative section, modify the neccesary details and then click Save.

Keeping your data accurate
General Data Protection principles include keeping data accurate and relevant. In addition, allpay will need the cardholder details to be accurate to continue to complete crucial PEPS and Sanctions cardholder eligibility checks.
Contactless
Use the toggle on this page to enable or disable the contactless option for cardholders.

When should I turn off Contactless?
Mastercard® mandates that contactless functionality should be available on all cards, so you should not turn this off without permission from or knowledge of, the cardholder.
MCC
MCC stands for Merchant Category Code, and is how card spend can be controlled. All card transactions are put through a MCC and the system will check if this is a permitted MCC before the transaction can be accepted.
During programme setup, you will have the opportunity to select a number of merchant category codes to block at the highest level. These can only be re-enabled at the same high level and, if you want to do this, you will need to speak with your allpay Client Development Manager. In addition there are a number of MCCs that are always blocked on allpay Prepaid cards, including:
- Money Transfer - Transactions related to sending or receiving funds via money transfer services
- Quasi-Cash transactions - Transactions that include purchase of prepaid cards, digital currencies and other cash-equivalent instruments

Using the tables and filters provided, you can enable and disable specific merchant category codes at a cardholder level. To do this use the toggle under the Status column.
Event Log
This section allows you to view audit information relating to activity on the cardholder's account, such as card activation, renewal, suspension and more. It's purely for information, to help you manage the programme and any investigations on the timeline of card actviity.

Notes On this page you can add notes to the cardholder's account. You can make different use of this functionality depending on the requirements of your organisation.
Using a Prepaid card online
If you have opted to allow your cardholders to use their cards online, they will need to complete an extra step before making payments online. Instructions are included in the letter that comes with the card. Any cardholders that may want to make payments online will need to have a UK (+44) mobile phone number registered to their Prepaid account.
Cardholders will need to visit https://www.3ds2.allpay.net/ and set up their online password, which they will use for online payments. Cardholders will need to provide their first and last name, date of birth, and the last 4 digits of their card number.
Passwords should be 4-6 characters long and include a mix of uppercase and lowercase letters and numbers. Passwords should not contain any symbols or special characters.

When making transactions at online checkouts, after entering the long card number, expiry date and security code, the cardholder will be asked to provide their 3DS2 password to authenticate the purchase.
Online purchases made with a prepaid card require a mobile phone number to be linked to the account.
Your cardholders do not need a mobile number to receive a prepaid card.
They do, however, need a mobile telephone number if they want to make online payments with their card. This is because online transactions require a one-time passcode (OTP) which can only be sent via text message to the cardholder’s mobile phone. A landline number cannot receive these messages and so it cannot be used for this purpose.
To complete online payments securely, the cardholder must pass a multi‑factor identity check. This means providing two types of information:
- Something they know - for example, a password
- Something they have - such as a mobile phone that can receive a one-time, six‑digit code by text message
This process helps confirm that the person making the payment is the legitimate cardholder. All financial institutions are required to use this type of security.
You may be familiar with similar checks when using a banking app, such as being asked to verify your identity with a code or a fingerprint.
Payees (Direct Payment programmes only)
A search for payees can be made using the following fields:
- Name of the payee
- Any alias set up for the payee
- Sort code & account number
- Created date of the payee
- Who it was created by (organisation or individual)
- Number of cardholders who use this payee
- Type of payee - personal or company

You can add a new payee, by clicking the green CREATE PAYEE button. You will need the following information when setting up a payee:
- Whether the payee is an individual or a company
- The payees first name and last name or business name
- Account number & sort code
- An alias to identify the Payee easily
Once all this information is filled out, a confirmation of payee check will be undertaken. A confirmation of payee check is required to help protect your cardholders from fraud and misdirected payments by checking that the name on a bank account matches the person or business you intend to pay before the payment is sent.
If the screen shows this -

It is important to check the details inputted and make sure they are correct.
Reports
To manage allpay Prepaid effectively, you can access seven different reports within your chosen date range under the Reports tab. These reports can be downloaded in a CSV format (in future updates, reports will also be available in .XLSX and PDF format). These will only be available if you have the permissions to see reports.
Generating Reports
In the Report Generation tab you can find a number of reports you can generate with specific date criteria.

Report Type Use the drop-down menu to select the type of report you wish to generate. You can generate the following:
- Card Status report Lists all cards by their status (activated, not activated, blocked):
- Generation date
- CardholderName
- CardholderId
- MaskedCardNumber
- Amount
- Card Status
- Account Status
- OrganisationName
- ReportingDate
- Successful Transactions Report Lists all succesful transactions on the prepaid scheme across a date period.
- CardholderID
- CardholderName
- Description
- TransactionDate
- MerchantName
- MerchantLocation
- Status
- Amount
- MCC
- Organisation
- GenerationDate
- Funding Account Report Lists all credits and debits on the funding account across a period:
- BankingDate
- OrganisationName
- AccountNumber
- SortCode
- PendingBalance
- AvailableBalance
- GenerationDate
- Negative Balance Report Lists all cards that have been in a negative balance across a period:
- CardholderID
- ContractNumber
- StartingDate
- EndingDate
- StartingStatus
- EndingStatus
- StartingBalance
- EndingBalance
- StartingFilename
- EndingFilename
- BalanceMovement
Can prepaid cards go into a negative balance?
Normally prepaid cards cannot go into a negative balance, and any transactions that would push the card into a negative balance would be declined.
Occasionally, however, certain merchants will complete their transactions 'offline' so we don't get the opportunity to decline a transaction before the goods are received; depending on the balance of the card this can push the card balance into a negative. In these cases the card will be suspended to prevent further negative accumulation.
- Personalised Card Orders Lists all physically produced cards in a period, including brand new cards and replacement cards
- OrderDate
- CardHolderName
- ClientID
- CardNumber
- Delivery
- DeliveryAddress
- CardProgramName
- OrderType
- Reference
- CardType
- Organisation
- GenerationDate
- Inactivity Report Displays all prepiad cards that have not had a debit transaction in the last 7 days
- CardholderName
- DaysSinceLastDebit
- LastDebitActivity
- ClientID
- Product
- Balance
- Organisation
- GenerationDate
- Cardholder Information Report Displays all cards on your prepaid scheme with their key details
- CardProgramId
- OrganisationId
- ClientId
- CardStatus
- Title
- FirstName
- LastName
- DateOfBirth
- AddressLine1
- AddressLine2
- AddressLine3
- AddressLine4
- City
- Region
- Postcode
- Country
- EmailAddress
- MobileNumber
- AccountNumber
- SortCode
- GenerationDate
Need to quickly grab the account numbers and sort codes for all your cards?
You can use a Cardholder Information Report to grab account numbers and sort codes of all the cards on your prepaid scheme, which is ideal if you're uploading a large batch when you start using the system.
Remember if any cards have a potential PEPS or Sanctions match, you will need to work with our compliance team to clear the match before the card will appear in allpay prepaid and the Cardholder Information Report.
Cardholder Statment Generates a running statement for the given client ID.
Are there any other formats available for my reports?
Currently all reports are generated in CSV (Comma separated values) format. In future updates, allpay prepaid will support Excel and PDF formats.
Safeguarding Reports
Safeguarding Reports contain information to assist you in managing your prepaid scheme.

Safeguarding reports are generated every working day (am) provided new information has become available. There are four types of Safeguarding Report:
Card Status Report Lists all cards by their status (activated, not activated, blocked)
Cards With No Debit Transaction Over 7 Days Report Lists cardholders who have not made a debit transaction in over 7 days.
Cards With No Debit Transaction Over 30 Days Report Lists cardholders who have not made a debit transaction in over 30 days.
Funding Account Balance Report Lists all credits and debits on the funding account across a period.
Batch Management
Batch Management is a function which allows users with the associated user permissions to upload multiple records quickly and avoids users being required to complete many single action tasks, such as loading or registering cards.
allpay Prepaid via the Payments Hub users can currently complete the following tasks with batch management:
- Load Cards: Use this to load multiple cards with funds from your funding account
- Card Redeem: Use this to redeem funds from multiple cards back into your funding account
- Card Registration: Use this to register multiple new cardholder accounts
- Close Card: Use this to close multiple cardholders accounts (please note, if you're closing a secondary card, the primary cardholders account will still remain open)
Successful card registration records will still go through the allpay PEPS and Sanctions process in real time. If this check is passed the cardholder will appear on the portal.
Batch Management File Specifications
Links to all bulk templates can be found HERE:
Our batch management tool supports uploads of up to 100 records per file.
If a file contains more than 100 records, it will not pass validation.
To avoid errors, please split larger datasets into smaller files of fewer than 100 records before uploading.
Creating a batch file layout
Batch Management files can be uploaded in
- CSV Format
Each Column in the file corresponds with a piece of information included as part of a batch upload.
Template Guide
- The Name column shows the file header and should be exactly as written
- M indicates if the data is mandatory (YES), non-mandatory (NO) or conditional (COND)
- Type indicates if the data should be alpha (A) (letters) , Numeric (N) (numbers) or a mix of both (AN)
- Length indicates the maximum number of characters allowed
- Description contains a description of the data required, if it has a special format, or where you can get to the data
Load Card Template
|
|
Name | M | Type | Length | Description |
|---|---|---|---|---|---|
| 1. | Client ID | Yes | N | 10 | The unique identifier generated alongside all prepaid cards. |
| 2. | Load Amount | Yes | N | ? | The amount you would like to load onto the prepaid card in ££.pp format |
| 3. | Yes | A | ? | Use TRUE or FALSE to indicate if this field should send an email to the cardholder letting them know that their card has been topped up. (This must also be enabled at organisation and cardholder level) |
Card Redeem Template
|
|
Name | M | Type | Length | Description |
|---|---|---|---|---|---|
| 1. | Client ID | Yes | N | 10 | The unique identifier generated alongside all prepaid cards. |
| 2. | Load Amount | Yes | N | ? | The amount you would like to redeem from the prepaid card in ££.pp format |
| 3. | Yes | A | ? | Use TRUE or FALSE to indicate if this field should send an email to the cardholder letting them know that their card has been topped up. (This must also be enabled at organisation and cardholder level) | |
| 4. | Currency | ? | ? | 3 | GBP |
Card Registration Template
|
|
Name | M | Type | Length | Description |
|---|---|---|---|---|---|
| 1. | Title | Yes | CON | 14 | Dr/Mr/Ms/Miss/Mrs/Not Applicable |
| 2. | First Name | Yes | N | ? |
|
| 3. | Middle Name | No | A | ? |
|
| 4. | Last Name | Yes | A | 3 |
|
| 5. | Nationality | Yes | A |
|
GB (Note; only accepts this format) |
| 6. | Gender | Yes | CON |
|
Male/Female/Prefer Not To Say |
| 7. | Reference | No | AN |
|
Cardholders can be searched for using this |
| 8. | Date of Birth | Yes | N |
|
DD/MM/YYYY |
| 9. | Mobile Phone Country Code | No | N |
|
44 |
| 10. | Mobile Phone | No | N |
|
Mandatory for the cardholders to set up a 3DS2 password and complete online transactions |
| 11. | Home Phone Country Code | No | N |
|
44 |
| 12. | Home Phone | No | N |
|
Use a fake number if you don't have a home phone number for this field (e.g. 12345678) |
| 13. | No | AN |
|
|
|
| 14. | Confirm Email | No | AN |
|
Should be the same as Email |
| 15. | Address Line 1 | Yes | AN |
|
|
| 16. | Address Line 2 | No | AN |
|
|
| 17. | Address Line 3 | No | AN |
|
|
| 18. | Address Line 4 | No | AN |
|
|
| 19. | Town | Yes | A |
|
|
| 20. | County | Yes | A |
|
|
| 21. | Post Code | Yes | AN |
|
|
| 22. | Country | Yes | A |
|
GB (Note; Only accepts this format) |
| 23. | Card Delivery Address | Yes | CON |
|
cardholder/organisation (Note; only accepts lower case) |
| 24. | Is Primary | Yes | CON |
|
True /False |
Delivering to an Organisation address with batch management?
If you use the organisation delivery option with batch management, when uploading a Card Registration file the system will ask you to select one of your organisation addresses from a dropdown list when you submit the file.
This means when uploading a batch management file, if you need to send cards to different organisation addresses, you will have to spilt the file between the different addresses.
Close Card Template
|
|
Name | M | Type | Length | Description |
|---|---|---|---|---|---|
| 1. | Client ID | Yes | N | 10 | The unique identifier generated alongside all prepaid cards. This includes any primary, secondary or suppressed cards. |
| 2. | Yes | A | ? | Use TRUE or FALSE to indicate if this field should send an email to the cardholder letting them know that their card has been closed. (This must also be enabled at organisation and cardholder level) |

Click on the Import Data button in the top right of the screen and this will open the following window:

Give the batch a File Reference - a friendly name you can use to recognise the batch later on, select the sort of batch you're uploading with the Select an Import Type and use Upload File to give the system your file.

Once you've added your file, select Submit Request. The system will now begin to validate your file which may take a few minutes.
Once the file is validated, in the list it will appear with a Process button next to it. Click on this button to action the file.
Funding Account
The funding acccount is a virtual bank account that allpay sets up alongside each prepaid scheme
When utilising the load card functionality in the cardholder section, funds will be debited from the funding account to cover the top up. The redeem functionality will credit the funding account from the balance of the prepaid card.

In order to load funds to cards, there must be sufficient funds in your funding account. It is your responsibility to manage your funding account.
When transferring funds into your funding account, the Account Name will be the name of the organisation for your scheme. You can find the sort code and account number in the 'Funding Account' tab at the top of the page.
In order to view your funding account balance, log into the payments hub, select your product and select the 'Funding Account' tab. Funding transfers made from your corporate account to your funding account by BACs will credit your funding account by 10am on day three.
Funding transfers made by Faster Payments will credit your funding account in real time, although if they are made overnight after 11pm, these are held until 6am the following morning.
Please note that allpay do not accept CHAPS payments. Please note, loads made directly from the funding account are instant.
Movement of funds in the funding account can be filtered using the boxes at the top of each column. Filter options include:
- Date
- Reference/ClientID
- Type
- Status
- Amount
You can even export the information in this table using the Export Transactions button at the bottom of the page. This will be exported in the CSV format.
Interactive Voice Response (IVR)
To further support cardholders, Prepaid via the Payments Hub includes access to an intuitive Interactive Voice Response (IVR) telephone service, available 24 hours a day, 7 days a week.
The automated telephone service allows cardholders to access and manage key aspects of their Prepaid card. The main functions available through the IVR include:
- Card activation
- Requesting a card balance
- Listening to recent transactions
- Retrieving a card PIN
- Updating the IVR telephone access code
- Reporting a card as lost, stolen, or damaged
Access to the IVR is granted via a six-digit telephone access code which the Cardholder creates as part of the initial card activation.
The IVR number for all Direct Payment and General Spend cardholders is 0330 808 0102
PEPS and Sanctions Process
allpay Prepaid is a financially regulated product, and we must complete eligibility checks on all cardholders registered to a prepaid scheme.
allpay will use the information provided at registration to check if the cardholder comes up as a PEPs or a Sanction match:
- PEPS: This check is done for banking products and looks for individuals who hold or have held prominent public positions, like MPs or senior police officers, and their close relatives or associates
- Sanctions: This check searches the Sanctions register. This register relates to financial sanctions imposed by HM Treasury on persons who are subject to restrictive financial measures
allpay will screen all new cardholders upon initial registration or if updates are made to cardholders' details.
If a cardholder has been identified as a potential match for either of the above checks, our compliance team will be in touch.
Contact Information
We offer a wide range of support services for all aspects of our business and products.
For all contact details please refer to our contact page on our website
https://www.allpay.net/contact/