
Customer Account Manager User Guide
Introduction to Customer Account Manager
Order a Card on an Existing Account
Changing Customer Account Details
Introduction to Customer Account Manager
Customer Account Manager is a secure solution that enables your organisation to create and manage customer accounts as well as order Payment cards. Customers can use these cards to make a payment over the counter at one of our payment network providers; Post Office, PayPoint or Payzone, or via one of our online payment platforms.
Access to Customer Account Manager is via the allpay Payments Hub. To see details about logging on to the Payments Hub please visit www.allpay.net/training-homepage
Customer Account Manager will appear greyed out for users who do not have the appropriate permissions enabled. Please refer to User Permissions for an overview of all available permissions. Alternatively speak with the Payments Hub administrators within your organisation if you do not have the permission required for your job role.
Customer Accounts
Customer Account Manager allows you to create Customer Accounts. These accounts generate a payment reference number (PRN) required for taking payments. You can request a physical card with the cardholder’s name and PRN embossed on the front if you would like your customer to make payments at a Post Office, PayPoint or Payzone outlet.
All physical cards ordered through Customer Account Manager will be produced and mailed on the same working day (where possible) as long as the request is received before 12 noon.
Creating a New Account
To create a new account using Customer Account Manager select Create New Account:

Select if you would like to send a physical card using the toggle button at the top and enter the Customer Information:

Client Code
The Client Code represents a particular scheme linked to your organisation. Please be aware, you may have more than one client code in the drop-down menu, when creating the account ensure that you select the correct Client Code as this is not a field that can be changed after the request is submitted, or the account is created.
Payment Reference Number (PRN)
If you are required to submit the 19-digit PRN to allpay, please enter those details into this field (This option will only appear if it is applicable to this specific client code).
Reference
The reference entered in this field will be used by allpay when notifying you of payments made by this customer. This field can contain a maximum of 16 alphanumeric characters.
Cardholder Name
The details entered here will be embossed on the front of the payment card. This field can facilitate multiple names (e.g. Mr & Mrs A Customer) and can contain a maximum of 27 letters.
Title & First Name
Enter the customer’s title and first name, as shown on the letter that accompanies the payment card (Mr Adam Customer).
Last Name
Enter the customer’s last name, as shown on the letter that accompanies the payment card (e.g. Mr Adam Customer).
Email Address
The email address entered in this field will be stored against this account. In future updates Customer Account Manager will support sending virtual cards directly to this address.
Use the next box to enter the delivery address as pictured below: Address Line 1, Town/City and Postcode are mandatory fields.

By default, the Use Delivery Address tick box will be filled in for the Billing Address section. If your customer has an alternative billing address untick this box and enter details as required. Noting again that Address Line 1, Town/City and Postcode are mandatory fields.
Once you are satisfied with the account detail entered select Submit request for approval.
You will receive an email shortly after submitting a request confirming the information submitted. This email will come from maildispatcher@allpay.net.

Order a Card on an Existing Account
To order a card on an existing account, navigate to Manage Accounts.

Use any of the filters to identify the account needing a payment card.

Select the account that you’d like to order a payment card for.

You will be presented with the information stored for this account. Here you can order physical cards for virtual accounts, and order replacement cards for physical accounts. You can tell if a card is currently only virtual, or if it has previously had a physical card with the Physical and Virtual chips at the top of the account.

Account Approvals
Once you’ve created a new account using Create New Account or made a card request through Manage Accounts you will need to approve this using the Account approvals screen.
Select Account approvals, the number of requests awaiting approval will appear on the button:

Here you will find a list of all the current requests that have been made by your organisation, for client codes that you have access too. You can find a quick preview of the information submitted for each request in the below table. Left click on a request if you wish to make any changes before submission, you can submit single requests this way as well with Approve card request.

When you are ready to submit requests to allpay, tick the check box on the left side of the respective rows, then select Approve_ Requests.

You can also select Cancel _ Requests if you would like to remove requests from this list. Once submitted, you can view requests in Submitted Account History. After submitting any request you will receive an email confirming the information approved. This email will come from maildispatcher@allpay.net.

Please note that an option to turn off account approvals is available, please contact your Client Development Manager for more information.
Changing Customer Account Details
To change customer details on an existing account, navigate to Manage Accounts.
Use any of the filters to identify the account you wish to change.
Please note: New accounts may take up to 48 hours to appear after submission.
Please Note: You can use the Filter client codes button on the right side of the screen to search for customers only on specific codes, simply tick the client codes you wish to search in the pop up menu.

Select the account that you wish to change.
A menu will appear on the right side of the screen with the account information contained within, select Edit.
Make the required changes to the account, then select Update account details to commit the changes.
Linking Accounts
If you have duplicate accounts set up for the same customer and they share the same reference, your customer may find it difficult to process a payment and may receive an error message similar to the one below.

To resolve this, you can now link accounts to stop a duplicate account and combine the payments from both accounts. Follow the steps below.
- Search for the accounts in Customer Account Manager via Payments Hub and select the two accounts that need to be linked. You'll see a Link Accounts button appear; click that button.

- You'll now need to enter a reason as to why you are stopping this account, they will then be superseded together. When you stop one account, it doesn't stop the functionality of that account but it does stop it appearing in searches.

- If accounts are linked successfully, you will see this message in the bottom right hand corner of the screen.

- However, if the account that you've selected to stop has a live Direct Debit mandate against it, you will need to choose another account to stop. If you stop the account with the Direct Debit mandate, you will stop the Direct Debit collections.

- Finally, if you see this error message, then this account has already been stopped.

Stopping Accounts
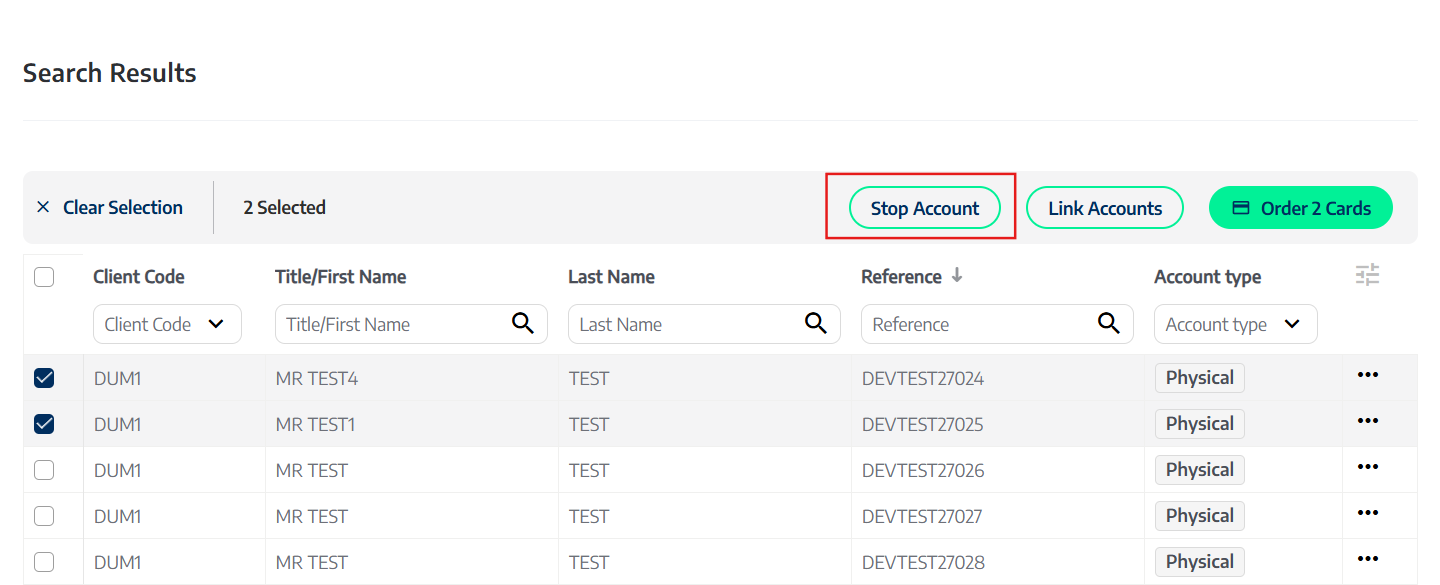
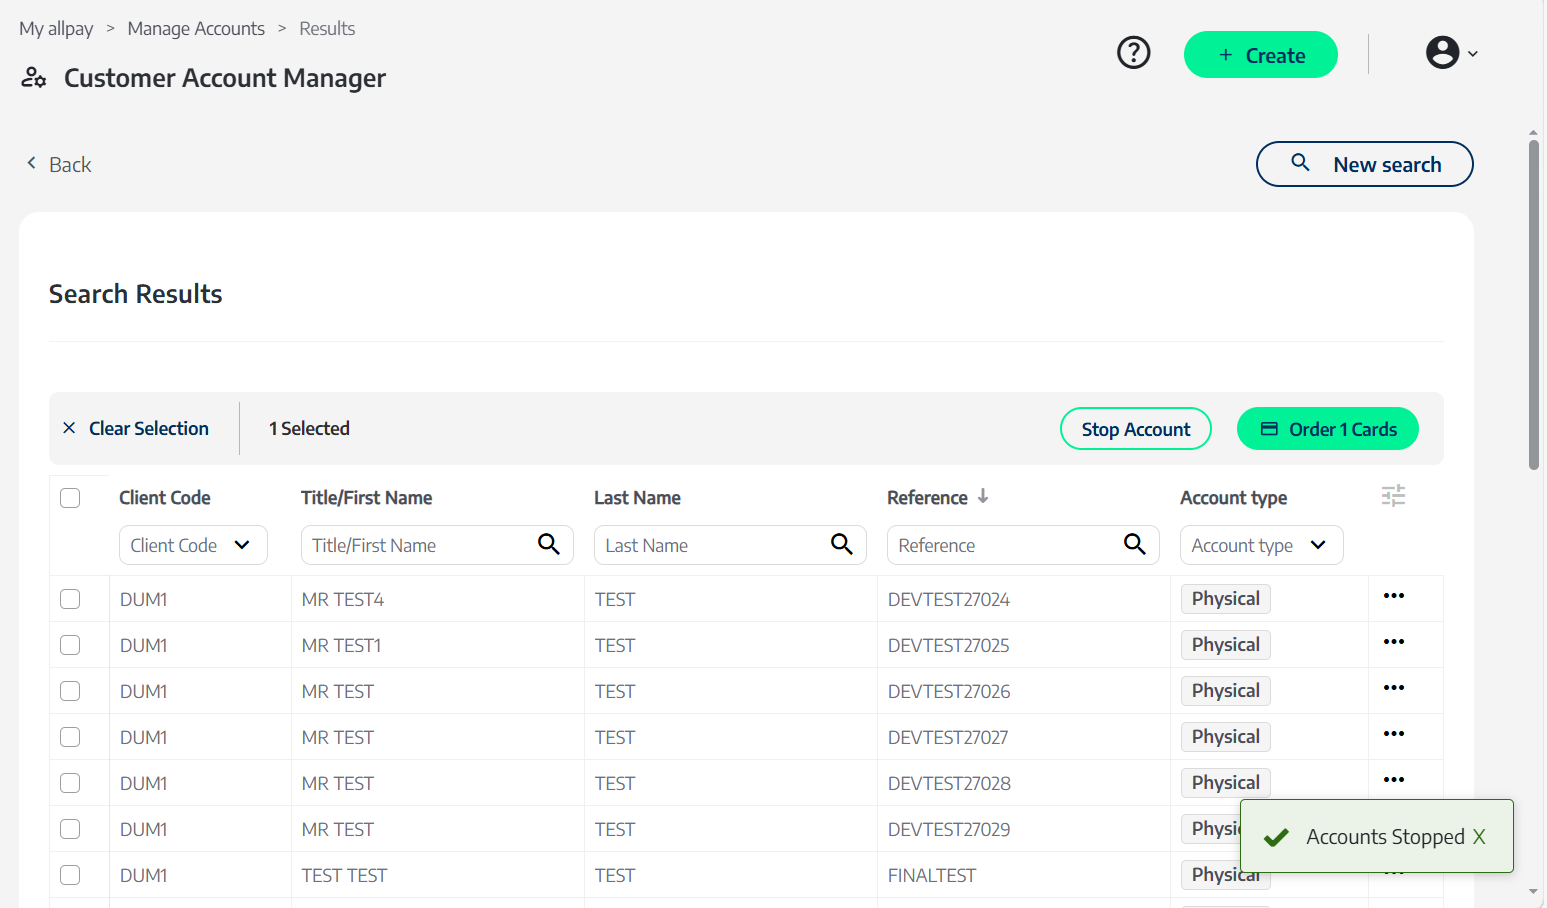
If you wish to stop an account within Customer Account Manager, select the account/s you wish to stop, and then click the 'Stop Account' button at the top of the data table in the action toolbar as circled below.
After you have pressed the 'Stop account' button, you should see the following screen.
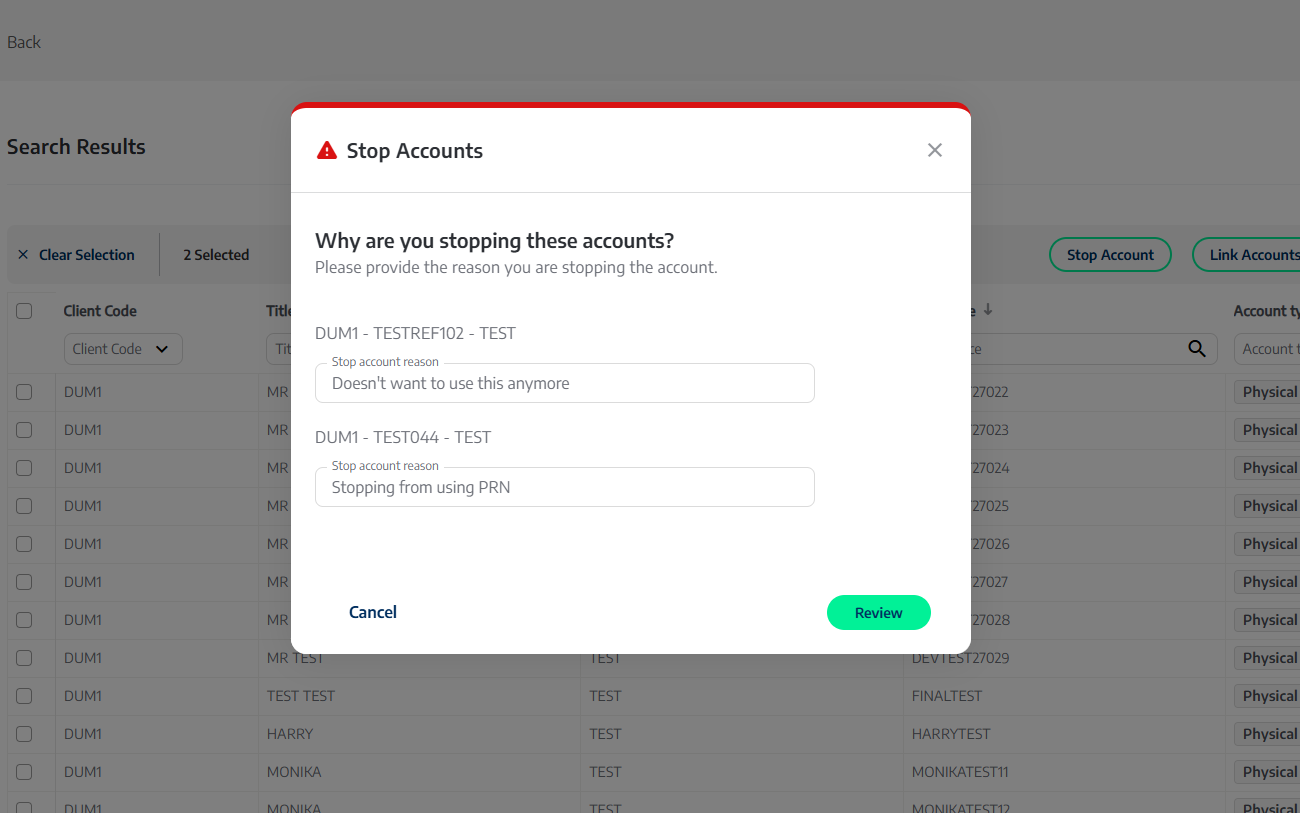
This requires you to enter a reason as to why you are stopping the account. Click Review once you have entered your reason.
Once you have selected Review, this screen will ask you to confirm the account/s you are choosing to stop.
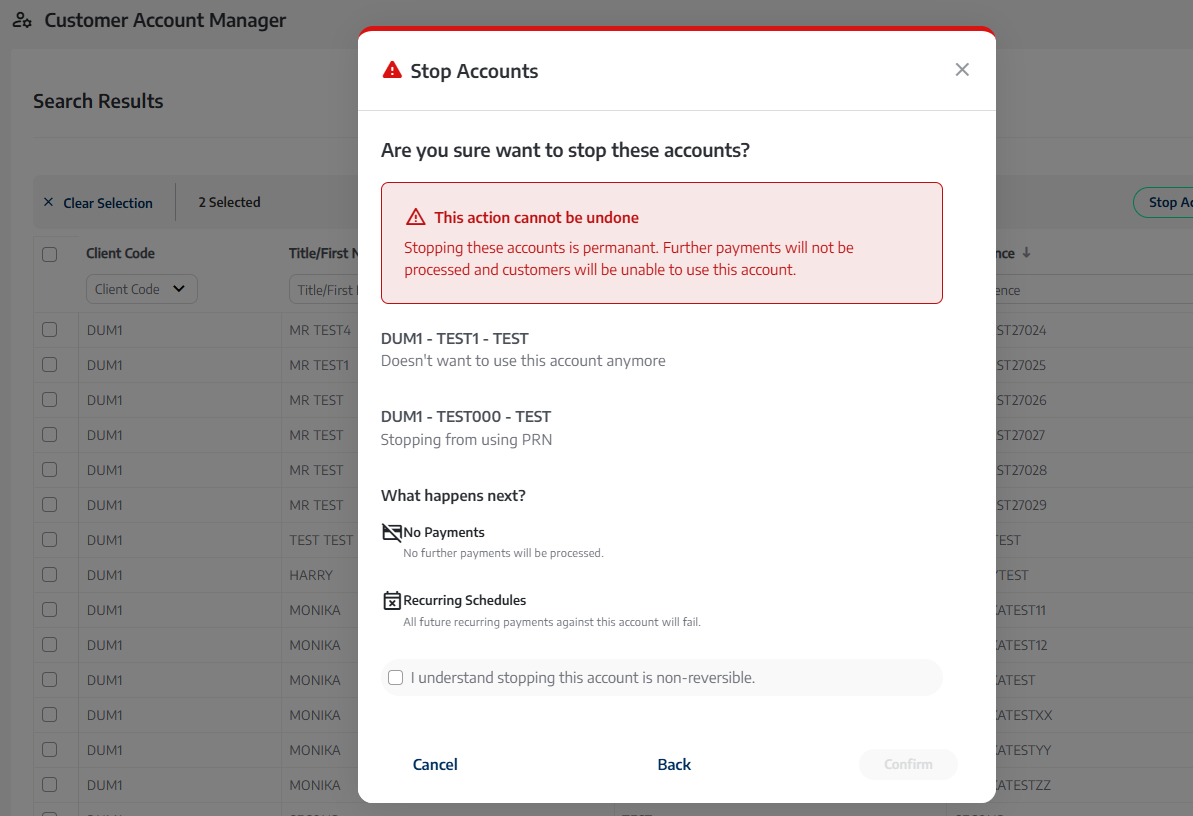
This action cannot be undone so please make sure that you check this is correct. Once you have reviewed this, you will need to click the checkbox to confirm you understand before you can select 'confirm' to progress.
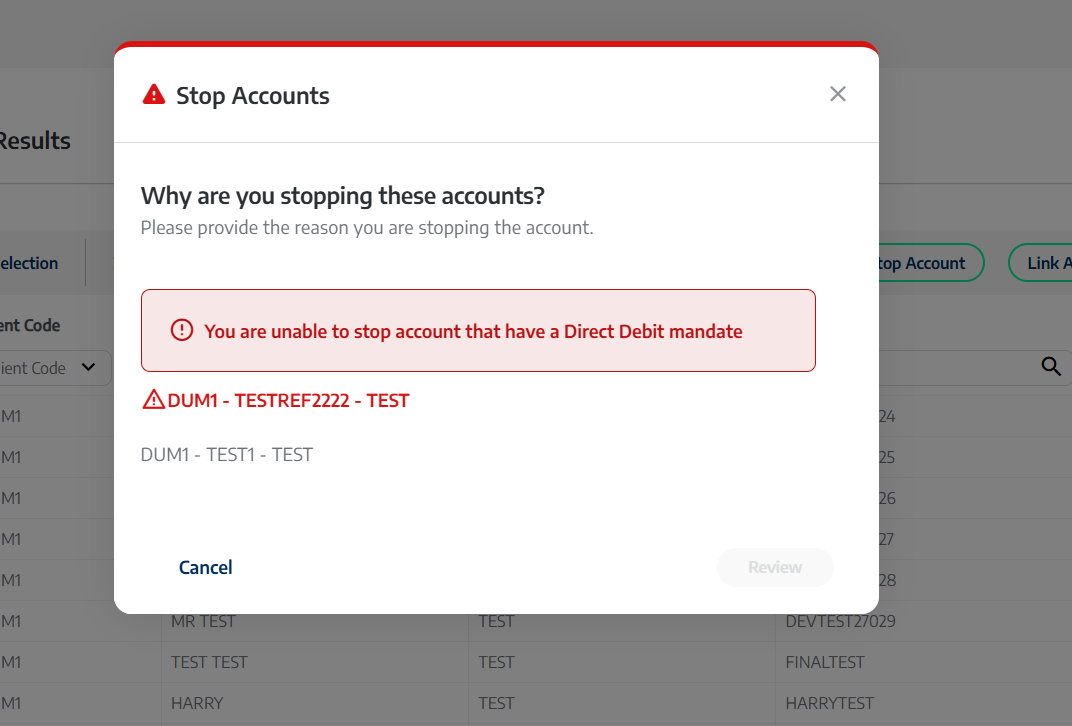
If any of your accounts have a direct debit mandate against them, the process cannot go further and you will see this screen below showing the error message.
Once you have successfully stopped the account/s, you will see 'Accounts Stopped' in the bottom right of your screen.
Bulk Card Ordering
File Import is available to Customer Account Manager users to order and re-order cards in bulk. This functionality avoids the need for users to enter records individually through the portal. After a bulk import file is uploaded, you will still need to submit the request through Account approvals.
To get started you will need to download the required template from the training library: https://allpay.helpscoutdocs.com/category/229-customer-account-manager
You can bulk upload New Cards and Replacement Cards, both use the same template and column layout.
Enter the Account Detail
Download the Bulk Import template. Use the headings as a guide for what information needs to populate each column, for each customer. Use Column F to indicate if this record requires a physical card, if No this account will be created virtually.
Each column on the template corresponds to a field of data in a customer account, mandatory fields are indicated in bold.
|
Column |
Data |
Length |
|
A |
Client Code | 4 |
|
B |
Client Reference | 16 |
|
C |
Title and First Name | 19 |
|
D |
Last Name | 19 |
|
E |
No Limit | |
|
F |
Physical Card |
1 Y for Yes 1 N for No |
|
G |
Name on card | 27 |
|
H |
Delivery Address Line 1 | 40 |
|
I |
Delivery Address Line 2 | 40 |
|
J |
Delivery Address Town/City | 40 |
|
K |
Delivery Address County | 40 |
|
L |
Delivery Address Postcode | No Limit |
|
M |
Billing Address Line 1 | 40 |
|
N |
Billing Address Line 2 | 40 |
|
O |
Billing Address Town/City | 40 |
|
P |
Billing Address County | 40 |
|
Q |
Billing Address Postcode | No Limit |
|
R |
Do not use | Do not use |
|
S |
Do not use | Do not use |
|
T |
PRN* | Varies |
Each row of the template excluding the headers on row 1 should contain at least the mandatory data required for each customer. Please use the table above to determine which column corresponds with each piece of data, fields in bold indicate mandatory, all other columns are optional.
*Please note if you are configured to enter your own Payment Reference Numbers this will be a mandatory field. If you do not enter your own Payment Reference Numbers, please leave this field blank.
Older versions of the bulk management template still work with the system, please refer the appendix to find out more
Uploading the completed template
On the Create New Account screen, in the top right you will find Bulk upload new accounts:

On the next screen you will be presented with the opportunity

Select Upload File and then find the saved completed template in your file explorer. Once you’ve chosen the file, select Submit Request
Please note: The upload file must be CSV format that does not exceed 2GB in size. If you attempt to upload a file that is not in a CSV format the following message will be displayed:
Approve the Requests
Once you have uploaded the completed template, the listed requests will appear in Account approvals .
Please Note: No accounts will be generated, and no cards will be produced until accounts are approved as outlined in Account approvals
User Permissions
When you access User Permissions on the Payments Hub, you can modify access and permission for elements of Customer Account Manager.

Account Creator allows users to submit new account requests via the Create New Account Screen.
Account Manager allows users to view accounts, edit account details and order cards on accounts that are already present in Customer Account Manager.
Account Approver allows a user to view, edit and submit account requests created by users.
If users have both Account Creator and Account Approver permissions, they can both submit and approve new account approvals without the input of any other users. If users have no permissions on Customer Account Manager, the product will not appear in their Payments Hub dashboard.
Client Code Groups
Users will only be able to create accounts for, submit requests for, and view accounts for, Client Codes in groups that they are members of.
For more information on Client Code groups please refer to the Payments Hub user guide which can be found at https://www.allpay.net/training/paymenthub.
Submitted Account History
Submitted Account History allows users of Customer Account Manager to access a list of account requests that have been approved already using Account approvals.

You will be presented with a list of approved requests in chronological order.

Select a record to view the information submitted to allpay.
Support and Training
Support
allpay provides a wide range of support services which cover all aspects of the business and its products and services. Normal office hours at allpay are 8:00am to 6:00pm Monday to Friday.
Training
To make best use of Customer Account Manager for your organisation we recommend users familiarise themselves with our training library materials at https://allpay.helpscoutdocs.com/category/229-customer-account-manager
In the training library, alongside this user guide, you will find instructional videos and answers to frequently asked questions.
Please note we advise users not to print out this user guide. This ensures they are always accessing the most up-to-date version.
Appendix
If you still have the old version of the template that does not feature the Email address field you can still upload to the system as you have previously. This template can only be used to order physical cards, if you require virtual cards please use the new template here
Required fields are indicated in bold.
|
Column |
Data |
Length |
|
A |
Client Code |
4 |
|
B |
Client Reference |
16 |
|
C |
Title and Initials |
20 |
|
D |
Surname |
19 |
|
E |
Name on Card |
27 |
|
F |
Delivery Address Line 1 |
40 |
|
G |
Delivery Address Line 2 |
40 |
|
H |
Delivery Address Line 3 |
40 |
|
I |
Delivery Address Line 4 |
40 |
|
J |
Delivery Postcode |
8 |
|
K |
Billing Address Line 1 |
40 |
|
L |
Billing Address Line 2 |
40 |
|
M |
Billing Address Line 3 |
40 |
|
N |
Billing Address Line 4 |
40 |
|
O |
Billing Address Postcode |
8 |
|
R |
PRN* |
Varies |
*Please note if you are configured to enter your own Payment Reference Numbers this will be a mandatory field. If you do not enter your own Payment Reference Numbers, please leave this field blank.